I couldn't help myself. I made another one. This one will have all the physical items I've made.
Tuesday, December 10, 2013
Sunday, November 10, 2013
Etsy Shop
Weeee! I opened a shop on Etsy!
It probably won't make me much money because I have terrible luck at that but I'll be putting up Photoshop resources and some various doll items here and there.
Check it out!
It probably won't make me much money because I have terrible luck at that but I'll be putting up Photoshop resources and some various doll items here and there.
Check it out!
Friday, October 18, 2013
Dolly Update 2
Next up is Operetta. I got her a few weeks back. I haven't done anything to her because I'm not sure what I want to do yet and I want to be sure since I'm horrible at doing eyes. I like her hair, but at the same time I kind of don't and a reroot practice would be good. So mostly this is just a post about the clothes I've made for her....


The awesome skirt I made for her. If I had the right figure I'd totally make one for myself. I haven't really made any shirts for her but I want to pair this with a long asymmetrical black tank.


Some badass leggings (scrap fabrics bin at Hobby Lobby is like a treasure box of awesomeness). They're not perfect because I had to leave some wiggle room for her ginormous calves since the fabric isn't super stretchy. She's wearing her skirt as a top.

 Skirt and dress (and headband) from the same old shirt.

 Knit skirt with leg warmers and some booty shorts that are a test run from the pattern I made.
 Also, I was looking ALL OVER for some super thin velcro because I didn't want to buy something stupid like velcro online, but none of the stores around here have sew-on velcro that thin. Then I finally saw this stuff in Walmart the other day. It's supposed to be used for keeping electronic cables and such together but it sews onto fabric beautifully and is super thin and flexible. Six bucks for four pretty long rolls. I'm sure it will last me a while.


The awesome skirt I made for her. If I had the right figure I'd totally make one for myself. I haven't really made any shirts for her but I want to pair this with a long asymmetrical black tank.


Some badass leggings (scrap fabrics bin at Hobby Lobby is like a treasure box of awesomeness). They're not perfect because I had to leave some wiggle room for her ginormous calves since the fabric isn't super stretchy. She's wearing her skirt as a top.


Dolly Update 1
I'll do this in two parts since it's about two different dolls.
First up is Sophie from my Liv dolls whose face I repainted. Just as a recap, this is what she looked like before:

This is what she looks like now:
 Not great, but I don't think it's that bad for a first repaint. I kept it simple because I'm horrible at drawing a line of any sort. There are some subtle and not so subtle flaws, like her eyebrows being a bit wonky, she's got no lower lashes or any definition to her eyelids, and there's a mystery spot of something glossy on her forehead. Like I said, I tried to keep it within what I could handle.
The wig is Tibetan lambskin. It's not that great. I was trying not to spend too much money so I wouldn't get in trouble with the hubby, so I bought some 2" scrap pieces (but not enough of each color because I'm REALLY bad at math). But then I had the ingenious idea to do a two color wig but couldn't find a pattern that would position the colors where I wanted them to be, so I had to make one from scratch and it ended up not being so good. That's also a pretty bad shot of the wig. I don't know what is going on but it wasn't laying the way it's supposed to. Here's a better shot of the wig:

And here she is with the pink Moxie wig I have and the entire outfit I made for her:

That's actually not the original dress I made. The first one was a tan vintage fabric with little flowers on it.
And here's her new (not so good) shoes:

First up is Sophie from my Liv dolls whose face I repainted. Just as a recap, this is what she looked like before:

This is what she looks like now:

The wig is Tibetan lambskin. It's not that great. I was trying not to spend too much money so I wouldn't get in trouble with the hubby, so I bought some 2" scrap pieces (but not enough of each color because I'm REALLY bad at math). But then I had the ingenious idea to do a two color wig but couldn't find a pattern that would position the colors where I wanted them to be, so I had to make one from scratch and it ended up not being so good. That's also a pretty bad shot of the wig. I don't know what is going on but it wasn't laying the way it's supposed to. Here's a better shot of the wig:

And here she is with the pink Moxie wig I have and the entire outfit I made for her:

That's actually not the original dress I made. The first one was a tan vintage fabric with little flowers on it.
And here's her new (not so good) shoes:

Thursday, October 17, 2013
Nook cover
Nook case that I redid a few weeks ago and never got around to posting. I liked the style of my old one but it was getting pretty gross. I sewed all the edges and the elastic then glued cardboard between the fabric on the front and back, while gluing the sides of the center piece and the bottom/side edges of the pocket in between those layers. It's far from perfect (that pocket is pretty crooked), but it works and looks mostly pretty.


Monday, October 14, 2013
Baby's Room
I have been putting off making this post because the baby's room isn't quite finished how I want. But I'll go ahead and throw it up here and just update later.
I'll start off by saying that we only had a crib and changing table for her that were two different colors and bought a vintage dresser for $20 at a yard sale. Also a different color from the other furniture. The hubby thought it would be nice to have dark/black furniture with pink accents/bedding, but I knew already that I wanted her room to be bright. the pink and green happened to be a happy accident in my color scheme. I don't remember what I saw or bought that made me go that direction but I'm glad I did.


Above is the awesome dresser and it's no so awesome knobs (that I have saved for painting and using elsewhere).

Got these babies at Hobby Lobby for pretty cheap. They were having a bogo on their knobs and I wanted something "girly".
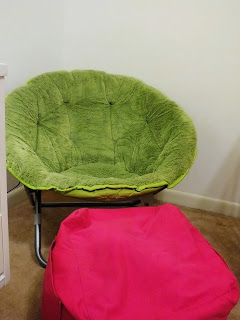 Picked up the green chair and two pink bean bags at a yard sale for $10.

This is the dresser after we painted it. The two lamps came with our living room set and they were orange but the hubs painted them pink. Curtains were from Walmart and the canvas things were clearance at Hobby Lobby.

Closeup of the knobs on the dresser.


Changing table and wall art we picked up at Hobby Lobby on clearance, and her crib which now hold all her stuffed animals that she throws on the floor when she doesn't want to go to bed.
I've also got two frames that I would like to use on some artwork I make Lexi do in the near future. And there's a fuzzy pink rug at Walmart that I've been eying for her room.
I'll start off by saying that we only had a crib and changing table for her that were two different colors and bought a vintage dresser for $20 at a yard sale. Also a different color from the other furniture. The hubby thought it would be nice to have dark/black furniture with pink accents/bedding, but I knew already that I wanted her room to be bright. the pink and green happened to be a happy accident in my color scheme. I don't remember what I saw or bought that made me go that direction but I'm glad I did.


Above is the awesome dresser and it's no so awesome knobs (that I have saved for painting and using elsewhere).

Got these babies at Hobby Lobby for pretty cheap. They were having a bogo on their knobs and I wanted something "girly".


This is the dresser after we painted it. The two lamps came with our living room set and they were orange but the hubs painted them pink. Curtains were from Walmart and the canvas things were clearance at Hobby Lobby.

Closeup of the knobs on the dresser.


Changing table and wall art we picked up at Hobby Lobby on clearance, and her crib which now hold all her stuffed animals that she throws on the floor when she doesn't want to go to bed.
I've also got two frames that I would like to use on some artwork I make Lexi do in the near future. And there's a fuzzy pink rug at Walmart that I've been eying for her room.
Friday, May 17, 2013
New stuff coming...eventually.
To anyone who might be reading this, we've been in the process of PCSing (moving) to GA. The very small, somewhat backwoods town of Valdosta. It's not too bad I guess. The scenery is nice when you're on the good side of town and the people I've come across are either nice enough or kinda weird, but I haven't met any of those downright assholes that seem so abundant in Pensacola. Also, most of the people here know how to drive. I've yet to get my usual dose of road rage.
Anywho, I've got a few projects on the way once we get the supplies to get them done. My favorite being the vintage, mid century style dresser I found. I've also been on the hunt for, and found some unique photo frames. And I still have my daughters furniture that I have to repaint because none of the colors match.
I would like to get a sewing machine and redo the material on our "new" couches but my husband likes the color scheme so I'll have to wait until it gets worn before I do that. We've also got a coffee table I found that needs refinishing. I'm not sure if it's vintage or what. It seems like it is because of the quality but it's got a very modern design. Oh, and the bar stools I want to paint and reupholster because they're kinda blah, they look like every other Walmart/Target bar stool out there.
I may post up a few crochet/knit/knook projects at some point. They will mostly be household items. But doll stuff is on hiatus for a while longer.
I will get around to putting up pictures of my projects on here and some pictures I've taken of the scenery here up on my photoblog ([ART] Photographix--in case you were interested).
Wednesday, February 6, 2013
Yarn Wig
I found a cute little tut on how to make doll wigs out of yarn here: Yarn Doll Wig Tutorial and decided to make one myself with some leftover yarn I had from the Kindle sleeve I made for my husband.
CLEARLY, it did not turn out as well and doesn't look much like hair (which is fine since I was going for a dreadlocks look anyway) but I think it looks cute enough on Dani.


Please excuse the nip slip going on here but I thought it was a nice picture aside from that.


Ahahahaha! I tried to move her eyes like she was looking at the flower but it's hard to do without eyelids. It just looks like she's ready to either devour or kill he flower. Maybe both. YOO DISHONOR! I KEEL YOO!
Some extras:


Thursday, January 31, 2013
New Blog
I have set up a new blog for all of my artwork at [ART] Photographix and will be taking down art related things from this blog.
Sunday, November 11, 2012
Just for fun
Some extra pictures I took today of the laydeez.
 |
| (It was so cool in the house this morning that Daniela's [spa edition] makeup changed.) |
 |
| (Aha! I just realized she looks like an old lady with back pains in this one.) |
 |
| Ooh, girl! Pull your skirt down! |
 |
| Lomo. |
To clarify...
Moxie Teenz wigs DO fit on Liv dolls. I was reading all over the internet trying to figure this out because the cheapest Liv wigs I could find were on Amazon and would have ended up costing at least $10 after shipping and all that. And I'm a cheap-ass so that was no bueno for me.
In my research I kept getting mixed stories. "Oh they fit."--"Well, I have both and they don't." Blah blah blah. They have them for $5 at Toys R Us, so I just grabbed two and said to hell with it.
And what do you know, Moxie Teenz wigs DO fit Liv dolls.
Here's proof:


Mizz Dani in a beee-yooo-tee-ful pink wig and "rave"outfit I made for her from some old aerobics pants I had. Snazzy!
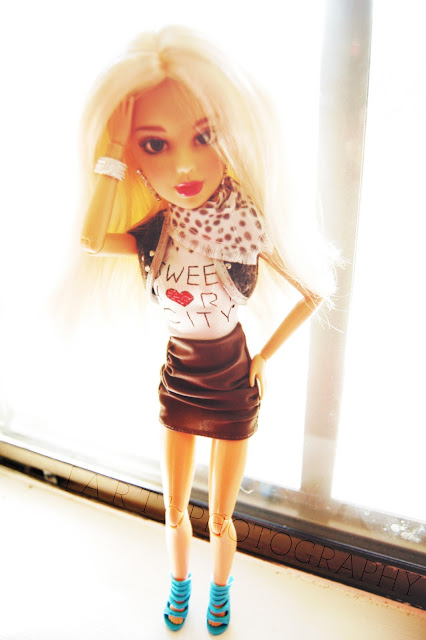
 And here's Soph in a blond-ish wig. Wearing some clothes I jacked off a Stardoll (ugly little things, those--but super cute clothes!), and also Stardoll shoes. They're a bit big but YOU can't tell and that's all that's important. The bolero is hers though.
I will say, though, that it probably just seems like they don't fit because unless you either (a) put some kind of sticky stuff down like tack or double sided tape or (b) don't move them around hardly any, the wigs fall off because there is nothing holding them on.
I will also say that you get what you pay for. These wigs are not nearly as full as a Liv wig. It's also possible some lazy employee made mine since the pink wig is actually half decent while the long blond wig is so shoddy there are obvious areas that don't get covered. I had to spend 5+ minutes spreading the hair out just right on Sophie to cover the bald spots. There was also about three yards (not literally) of extra plastic hanging off the blond wig that I had to cut off.
Worth it.
In my research I kept getting mixed stories. "Oh they fit."--"Well, I have both and they don't." Blah blah blah. They have them for $5 at Toys R Us, so I just grabbed two and said to hell with it.
And what do you know, Moxie Teenz wigs DO fit Liv dolls.
Here's proof:


Mizz Dani in a beee-yooo-tee-ful pink wig and "rave"outfit I made for her from some old aerobics pants I had. Snazzy!

I will say, though, that it probably just seems like they don't fit because unless you either (a) put some kind of sticky stuff down like tack or double sided tape or (b) don't move them around hardly any, the wigs fall off because there is nothing holding them on.
I will also say that you get what you pay for. These wigs are not nearly as full as a Liv wig. It's also possible some lazy employee made mine since the pink wig is actually half decent while the long blond wig is so shoddy there are obvious areas that don't get covered. I had to spend 5+ minutes spreading the hair out just right on Sophie to cover the bald spots. There was also about three yards (not literally) of extra plastic hanging off the blond wig that I had to cut off.
Worth it.
No-Sew Doll Skirt
Things you'll need:
-fabric (I used some old shorts)
-scissors
-fabric glue (optional)
-velcro (optional)
-some kind of string (optional)
*I will be showing you how to make this with velcro. If you don't want to use velcro you can use string to hold the skirt in place.*
Take your fabric and cut from the edge to however long you want the skirt to be.
Then cut along the width so that it wraps around the dolls body PLUS about an extra 1/2 inch.
Take your rectangle and along the length, cut out a smaller rectangle about 3/8in long by 1/2 wide.
(Hopefully the picture explains a little better. -- If you're using old clothes you can use the hem for the top edge and just cut out a 1/2 inch piece from that like I did)

Attach your velcro.Stick a piece on the front side where the extra fabric is and one on the wrong side where the flat edge is.
 Once it dries lay the piece face down and place your doll face down on top.
Take the side with the extra half inch and wrap it around the doll.
Then take the other side and wrap it over top to fasten the velcro.

 Ladies and gentlemen, we have a skirt!
 If you dont want to use velcro, you can tie string or a hair tie around the waist to hold it in place.
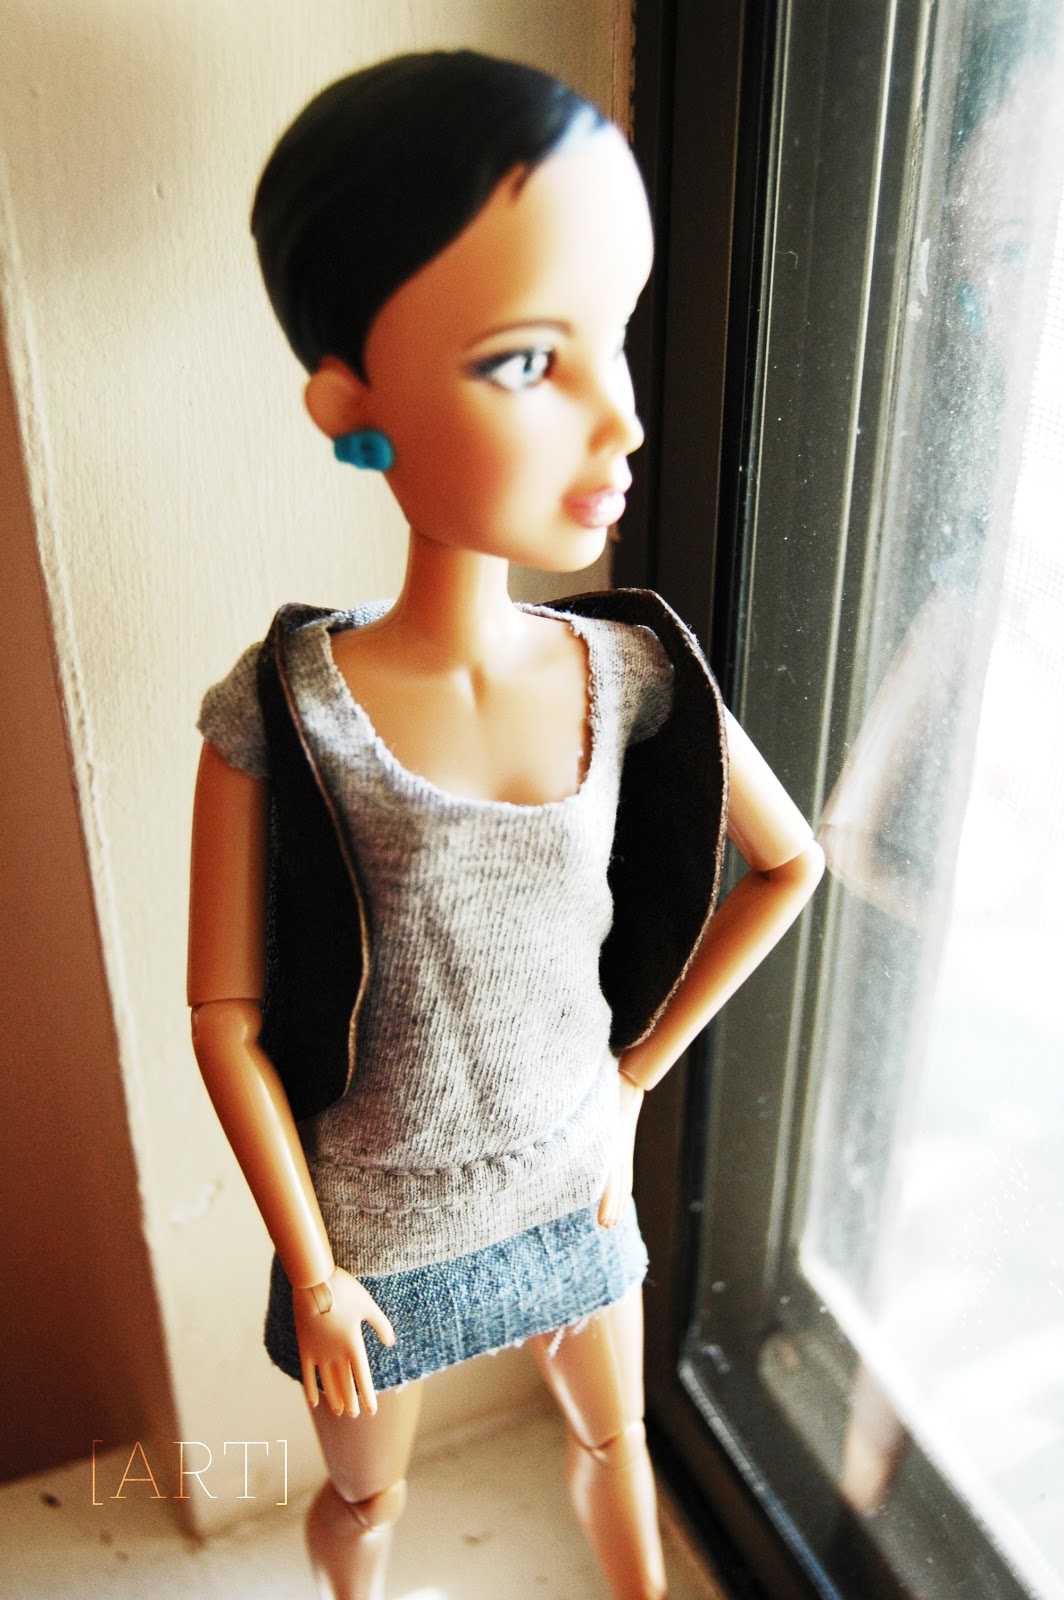
Paired with my no-sew shirt and a vest I made with some scrap leather:

-fabric (I used some old shorts)
-scissors
-fabric glue (optional)
-velcro (optional)
-some kind of string (optional)
*I will be showing you how to make this with velcro. If you don't want to use velcro you can use string to hold the skirt in place.*
Take your fabric and cut from the edge to however long you want the skirt to be.
Then cut along the width so that it wraps around the dolls body PLUS about an extra 1/2 inch.
Take your rectangle and along the length, cut out a smaller rectangle about 3/8in long by 1/2 wide.
(Hopefully the picture explains a little better. -- If you're using old clothes you can use the hem for the top edge and just cut out a 1/2 inch piece from that like I did)

Attach your velcro.Stick a piece on the front side where the extra fabric is and one on the wrong side where the flat edge is.

Take the side with the extra half inch and wrap it around the doll.
Then take the other side and wrap it over top to fasten the velcro.


Paired with my no-sew shirt and a vest I made with some scrap leather:
No-Sew Doll T-shirt
What you'll need:
-an old shirt (really any type of fabric)
-scissors
-fabric glue (optional)
-sew on velcro or stick on velcro which is easier but not as cheap. (optional)
-string/yarn, or hair tie (optional)
*I will be showing you how to do this using velcro. If you do not want to use velcro then use string to hold the shirt in place*
First thing's first; cut out a square that's long enough to cover the the length of the torso (unless you want a crop top) and wide enough to wrap around the dolls body.
 Then, fold the fabric in half width wise and place your doll on top. Using the scissors, make a slight cut in the fabric on each side of the doll where the arms will go (arm holes). If you want a tank top style, make the cuts more on top of the shoulder than by the arm like I've done.
 Next, cut a half circle between the two arm hole cuts you made. The wider the distance between the half circle and the arm holes, the wider your sleeve is going to be. But don't make the circle too big or you'll have some nip slips.

Now you'll want to cut along the folded edge up to the arm hole. Do this for each side.
Unfold the fabric and pick which half is going to be your backside and then, starting at the bottom of the armhole, cut down at a slight inward angle. (The right side on mine is just folded under. Both sides of yours should look like the left side of mine.)
 Then you'll take your velcro and cut it into skinny, long strips and use your fabric glue to glue it to your shirt.
You'll take the widest part and glue a strip onto the back and another onto the front along the edges. (or just stick them on there if you have the sticky kind) Wait for the glue to dry.
 Now for the fun part!
Pull the shirt over the doll's head (through the hole obvs) with the skinny piece in the back. Then, wrap the long sides around to the back and fasten the velcro!! Super simple!
 Et voila! A shirt!!!
 If you don't want to buy velcro you can always use a makeshift belt (ie string/yarn, or a hairband) to hold the pieces in place.
A DC shirt I made with this method:

-an old shirt (really any type of fabric)
-scissors
-fabric glue (optional)
-sew on velcro or stick on velcro which is easier but not as cheap. (optional)
-string/yarn, or hair tie (optional)
*I will be showing you how to do this using velcro. If you do not want to use velcro then use string to hold the shirt in place*
First thing's first; cut out a square that's long enough to cover the the length of the torso (unless you want a crop top) and wide enough to wrap around the dolls body.


Now you'll want to cut along the folded edge up to the arm hole. Do this for each side.
Unfold the fabric and pick which half is going to be your backside and then, starting at the bottom of the armhole, cut down at a slight inward angle. (The right side on mine is just folded under. Both sides of yours should look like the left side of mine.)

You'll take the widest part and glue a strip onto the back and another onto the front along the edges. (or just stick them on there if you have the sticky kind) Wait for the glue to dry.

Pull the shirt over the doll's head (through the hole obvs) with the skinny piece in the back. Then, wrap the long sides around to the back and fasten the velcro!! Super simple!


A DC shirt I made with this method:

Subscribe to:
Posts (Atom)